
Alex is the Driver of Le Wagon Shenzhen With his industry knowledge and years of

Sharing your product on social networks has become one privileged way to grow your userbase. But before you unleash your sharing fury, make sure your social meta tags are properly set.
<meta> tags are HTML tags in the <head> of a webpage, visible to anyone.
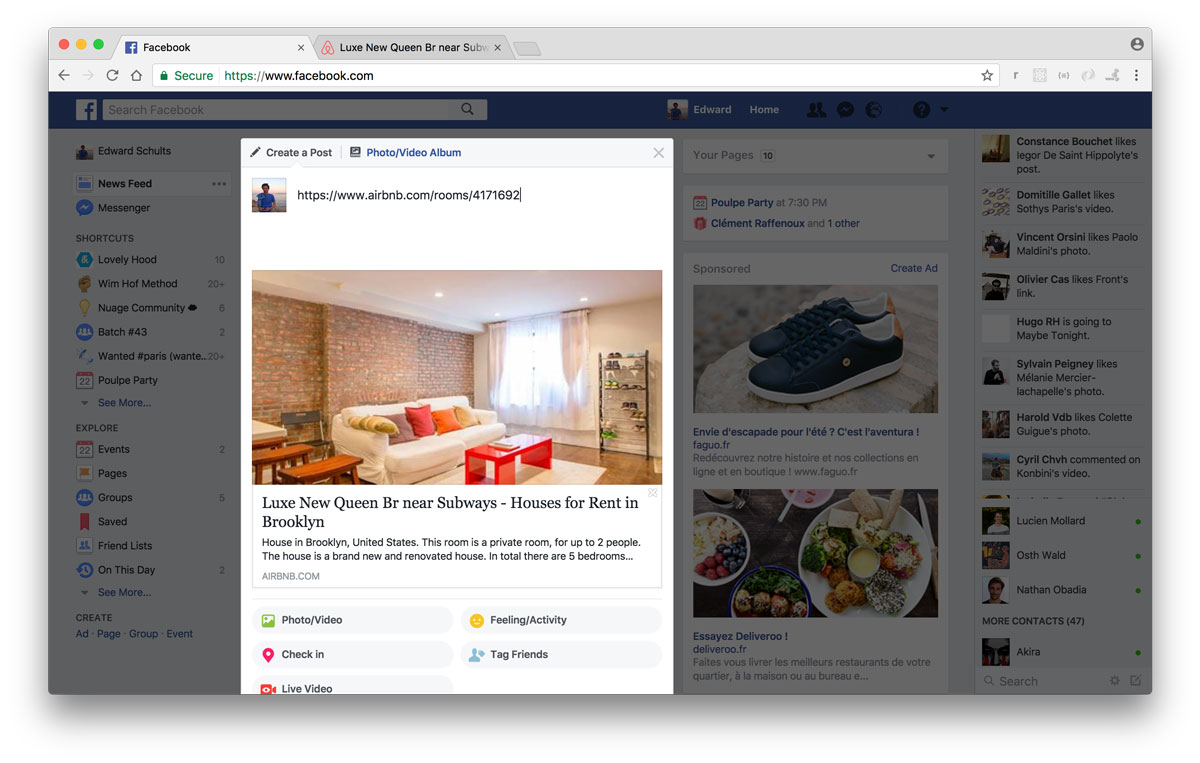
They provide the content displayed on social networks whenever your product’s url is shared in a post. Titles, descriptions and images should all be setup with care and consideration to improve your social exposure’s conversion rate. The right content, including optimized images have shown to help posts to spread, even leading to increased shares and mentions, improving natural SEO.
In this tutorial, we’ll see:
Let’s create a meta.yml file in config, with the following:
 # config/meta.yml
 meta_product_name: "Product Name"
 meta_title: "Product name - Product tagline"
 meta_description: "Relevant description"
 meta_image: "cover.png" # should exist in `app/assets/images/`
 twitter_account: "@product_twitter_account" # required for Twitter Cards
 # config/initializers/default_meta.rb
 # Initialize default meta tags.
DEFAULT_META = YAML.load_file(Rails.root.join("config/meta.yml"))
Important: as any file in the config/initializers folder, it is loaded when your app is launched. Any time you change the content in meta.yml, restart your rails s to refresh DEFAULT_META!
Now before setting up our meta tags in our views, let’s setup helpers that will encapsulate the following logic for our 3 keys :meta_title, :meta_description and :meta_image:
Let’s create a new app/helpers/meta_tags_helper.rb file with the following:
 # app/helpers/meta_tags_helper.rb
 module MetaTagsHelper
   def meta_title
     content_for?(:meta_title) ? content_for(:meta_title) : DEFAULT_META["meta_title"]
   end
def meta_description
content_for?(:meta_description) ? content_for(:meta_description) : DEFAULT_META["meta_description"]
end
def meta_image
meta_image = (content_for?(:meta_image) ? content_for(:meta_image) : DEFAULT_META["meta_image"])
# little twist to make it work equally with an asset or a url
meta_image.starts_with?("http") ? meta_image : image_url(meta_image)
end
end
Let’s override Rails.application.default_url_options[:host] by adding the following in app/controllers/application_controller.rb:
# app/controllers/application_controller.rb
def default_url_options
{ host: ENV["DOMAIN"] || "localhost:3000" }
end
Make sure your production DOMAIN variable is set with your domain name. If you deploy your code with Heroku for instance, just type in your terminal:
heroku config:set DOMAIN=www.my_product.com
 <title><%= meta_title %></title>
 <meta name="description" content="<%= meta_description %>">
<!-- Facebook Open Graph data -->
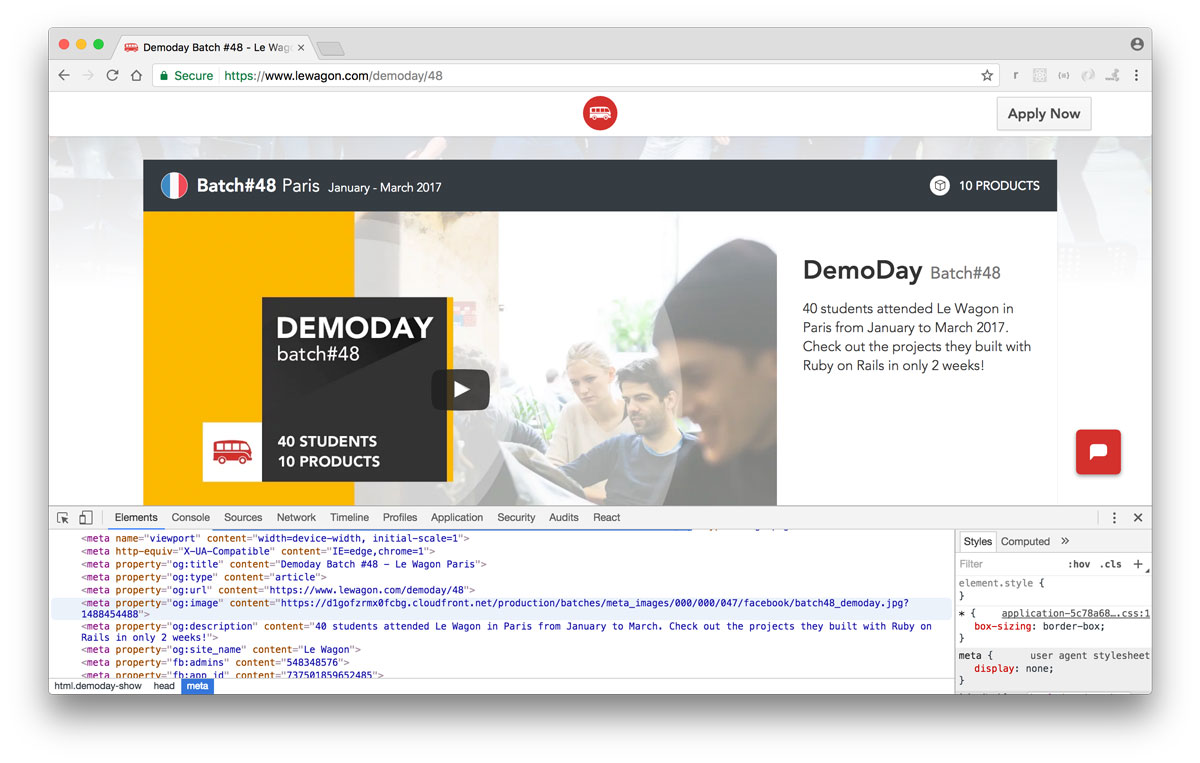
<meta property="og:title" content="<%= meta_title %>" />
<meta property="og:type" content="website" />
<meta property="og:url" content="<%= request.original_url %>" />
<meta property="og:image" content="<%= meta_image %>" />
<meta property="og:description" content="<%= meta_description %>" />
<meta property="og:site_name" content="<%= meta_title %>" />
<!-- Twitter Card data -->
<meta name="twitter:card" content="summary_large_image">
<meta name="twitter:site" content="<%= DEFAULT_META["twitter_account"] %>">
<meta name="twitter:title" content="<%= meta_title %>">
<meta name="twitter:description" content="<%= meta_description %>">
<meta name="twitter:creator" content="<%= DEFAULT_META["twitter_account"] %>">
<meta name="twitter:image:src" content="<%= meta_image %>">
 <!-- app/views/offers/show.html.erb -->
 <% content_for :meta_title, "#{@offer.name} is on #{DEFAULT_META["meta_product_name"]}" %>
 <% content_for :meta_description, @offer.description %>
 <% content_for :meta_image, cl_image_path(@offer.photo.path) %>
Social Networks provide debugging tools to help you check your tags are properly set.
Important : Facebook’s Open Graph recommends 1200×630 dimensions for meta images and a maximum file size of 1Mb. Read the documentation if you cannot manage to clear out all their warnings!
Alex is the Driver of Le Wagon Shenzhen With his industry knowledge and years of

From being a student in Barcelona to become the very first teacher in Porto Lucy

In our Tech Talks series we share real life stories from key characters in Turkish

Meet Laura a Le Wagon alumni After having an amazing time as a Web Development

What is the minimum viable product and how it can be used as a part

Sue comes from the US but has lived in many places along the way She